Close
0
You have no items in your shopping cart.
Search
Filters
RSS

Blog posts of '2025' 'October'

One more task for winterizing buildings
…plus an interesting new product.
Comments (0)
Preparing Your Barn for Winter: Ventilation Checklist

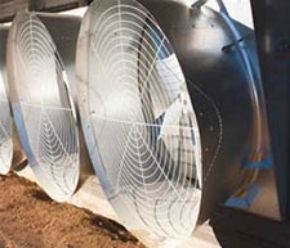
As winter approaches, proper barn preparation is vital to maintaining the health and productivity of your livestock, particularly in swine facilities. Effective ventilation is key to controlling air quality and temperature. Conducting a ventilation audit before the season starts ensures your barn is ready to support healthy animals through the cold months. Our Minimum Ventilation Checklist provides an easy guide to help you stay ahead of winter challenges.

The Importance of Winter Check-Ups

Winter inspections of ventilation systems are essential, as they often operate at reduced capacities during the colder months, allowing for a minimal margin of error. If the ventilation is not functioning properly, it can lead to increased humidity and gas buildup, adversely affecting pig health. Regular maintenance checks are necessary to maintain effective airflow for livestock during winter. This includes checking for blockages, ensuring fans and inlets function properly, and evaluating overall performance.

Key Areas to Focus On

To prepare your barn for the winter season, consider focusing on three main elements: Fans, Inlets, and Heaters. Implementing thorough checks across these areas will enable you to efficiently manage air quality and temperature.

  1. Fans: Regularly verify the performance of fans, including their RPM and physical condition. Dust accumulation can severely hinder efficiency, with a small amount decreasing airflow significantly. Maintaining clean exhaust fans enhances operational efficiency and the safety of the barn environment.
  2. Inlets: Inspect inlets for any blockages or damage that could disrupt airflow and ensure they respond optimally to control inputs. Proper maintenance of inlets ensures they can freely open and close, maintaining adequate ventilation.
  3. Heaters: When inspecting heaters, make sure all units turn on correctly and are free of dust. Verify that temperature probes are working and placed correctly. Also, ensure brooder emitters and box heaters are clean and free from debris or corrosion. Additionally, check that throttle valves are set properly and inspect tube heaters for any disconnections or problems with air intake and exhaust.

Building Considerations

Proper barn preparation encompasses more than just ventilation. Inspect the integrity of curtains, assess insulation needs, and seal any gaps around the walls to minimize heat loss. Additionally, ensure that soffits are clear to effectively withstand winter conditions.

Download the Checklist

Make barn preparation a priority this winter with our Minimum Ventilation Checklist. This practical resource provides a step-by-step guide to help you prepare your barn for colder weather.

Winter presents unique challenges, but a well-ventilated barn ensures healthier, more productive livestock. Don’t leave your barn unprepared—download the Minimum Ventilation Checklist today to ensure your ventilation system and equipment are ready for the cold months ahead!

Comments (0)
Winter Inspection Checklist for Swine Facilities
With cooler weather approaching, it’s important to make sure your barn is operating efficiently and ready for the winter months ahead. This period from fall to winter offers an opportunity to inspect your buildings prior to the drop in temperatures and before the first snow hits the ground. Being proactive and planning building inspections on a regular schedule could minimize the exposure to potential issues if found and promptly addressed prior to winter weather.

Use this inspection checklist as a guide to prepare your swine facilities for winter weather.

Winter Inspection Checklist for Swine Facilities

  1. Close soffit winter doors to avoid risking a snow filled attic. Inspect and clean open soffits.
  2. Inspect curtains for rips and tears. Repair and replace as needed. Install bubble wrap insulation between curtain and bird wire for additional insulation.
  3. Inspect bird wire and clean bin pads to keep birds from infecting the site.
  4. Check the ventilation system. Fans and louvers should be cleaned to remove dust. Insert solid winter louvers or plastic to reduce drafting.  Test inlet actuators and cabling and inspect inlets.
  5. Verify back up thermostat settings and test.
  6. Check all pullies and winches on emergency curtains and grease. Ensure there is no memory in the winch cable or white rust and ensure the clickers on winch have been removed.
  7. Verify all curtain drops are functional, drop cables in place, and perform a drop test.
  8. Verify all pit fans are functional and clean interior housings and louvers.
  9. Conduct heater maintenance and test gas lines for leaks.
  10. Inspect Feed Bin lids to ensure that they close properly.
  11. Evaluate winter rodent control protocols.
  12. Drain and winterize cool cell systems and pumps.
  13. Repair any leaky waterers or pipes. Insulate exposed pipes to avoid freezing.
  14. Seal cracks and inspect for leaks around door jambs.
  15. If a backup generator is present, verify it is serviced, has fuel with anti-gelling additive if using diesel, and test run it. Transfer power to ensure power transfers properly. Make sure all employees understand how to operate.
  16. Verify all contact information in the alarm system is up to date.
  17. Look for areas in the barn and attic that show moisture.
  18. Remove snow promptly from roofs.
      1. Use extreme caution when removing snow from roofs.
        1. Paint scraped away during removal will cause premature rusting.
        2. Screw heads which have been scraped off or screw holes which have become elongated can allow moisture to enter the attic.
      2. ALL ROOFS THAT HAVE HAD SNOW REMOVED IN THE WINTER SHOULD BE INSPECTED IN THE SPRING FOR SNOW REMOVAL AND STRUCTURAL DAMAGE. CHECK ENTIRE ROOF FOR ANY BACKED OUT OR LOOSE FASTENERS ON ROOF PANELS AND AT ROOF OVERLAP JOINTS.
  19. Keep snow from drifting against sidewalls of the building.
  20. Do not pile snow under or by eave.
  21. Trusses and roof structure (Any Found issues below need to be promptly addressed).
    1. Check that ridge caps and eave inlets have closure strips.
    2. Check that all truss web members are vertical and are not broken or bowed.
    3. Check that trusses are in plane (Sitting vertical, not leaning or out of square to the connected walls and lateral braces).
    4. Check that all truss metal plates are intact and do not show any signs of stress (cracks, twisting, or pulling away from the lumber) or corrosion.
    5. Check for any roof leaks and water damaged purlins or truss members.
  22. Inspect Loading Chutes, winches, hoists, and cables to ensure that they function properly and for structural integrity.
Comments (0)
Bait stations improve rodent control

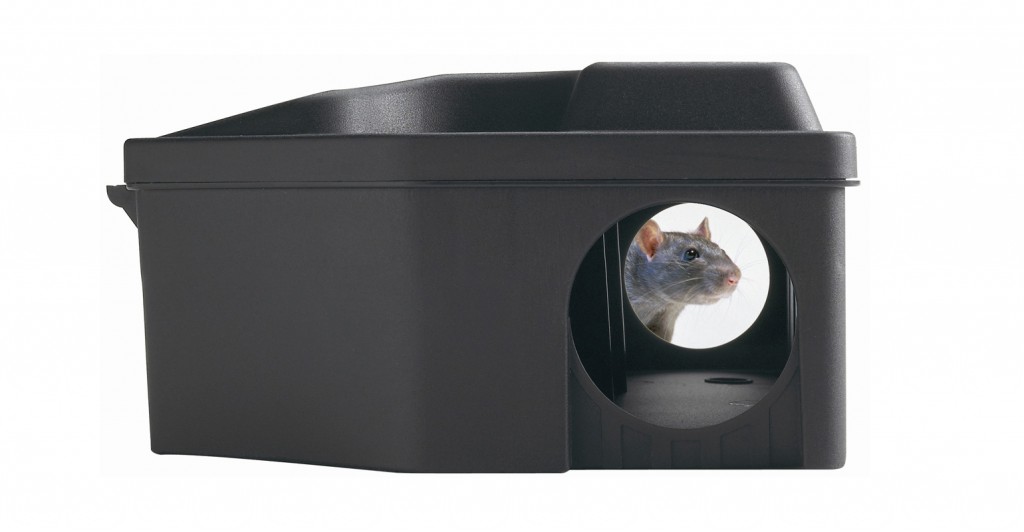
The use of bait stations improves the effectiveness of any rodent control program. Stations protect baits from rain and dirt, helping the rodenticides stay fresh and potent longer while providing security against access from children and pets. Bait stations also provide an environment where rats and mice feel secure when feeding on baits.

Bait Placement

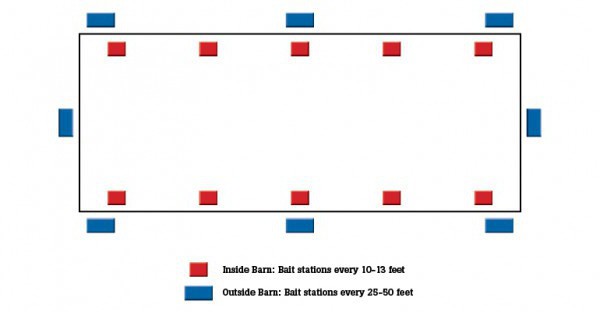
Rodents are creatures of habit and travel along established paths between their nests and food supply. They will not go out of their way to visit bait stations outside their normal traffic areas. Look for signs of rodent activity such as droppings, tracks and gnawing to locate pathways. Place mouse stations 10-13 feet apart as mice seldom venture more than 50 feet from their nests. Rats range much farther afield allowing station placement to be between 25 and 50 feet apart.

Bait-Stations

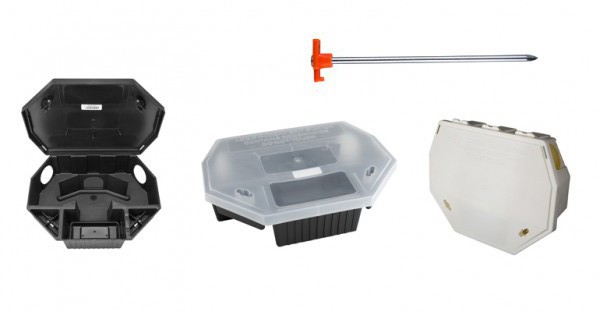
Do not use mouse stations when rats are present as the bigger rodents will gnaw through the thinner plastic and expose the baits. Consider using white colored bait stations for those locations on the south exposure of buildings. The interior temperature of black colored stations can increase by as much as 30° which may melt some bait formulations.

T Station

Securely fasten stations to walls or floors to prevent them from being moved out of the traffic pathway. Use tent stakes to anchor bait stations to the ground for exterior placement. T-style stations are very versatile in their applications. Nylon ties are used to fasten them to gate rails, rafters, and even feed pipes.

Check bait stations on a monthly basis as part of the routine barn maintenance program adding fresh bait as needed. Rodents will often refuse to eat spoiled or stale bait. Observe the condition of the stations themselves as plastic can become brittle, especially the lid hinge. Stations with rotating hinges will outlast models with thin bendable strips of plastic called living hinges. During periods of heavy infestation, it may be necessary to check daily to ensure an adequate supply of bait. Stations are available with clear lids to allow a visual check of bait levels without opening the lid.

It is important to be patient when dealing with rat infestations. Rats are suspicious of new objects in their territory, and it may be several weeks before they use a new bait station. Leave stations in place even after a heavy infestation is under control. Rats are more likely to enter bait stations that have become part of the "terrain" when baiting occurs in following seasons.

Go to bait stations for pricing and ordering information.  

Baitstation_mouse1540x800
Comments (0)